Customising an iOS UICollectionView Layout

Introduced in iOS 6, UICollectionView is a more powerful extension of UITableView. While a table view only allows you to layout rows vertically - the number of different interactions that can be implemented with a collection view are huge. You could make a carousel, a gallery or even a circular layout of objects. And its all thanks to the fact that you can create your own custom layout logic for the items in the collection.
If you have never used UICollectionView before, then head over to NSHipster and read Mattt Thompson’s excellent introduction. Or if you would like to learn about creating custom layouts in detail, then head over to Objc Magazine and read Ole Begemann’s post. If you really want to lose your mind about the possibilities of a UICollectionView, then see UICollectionView + UIKit Dynamics and Animating Collection Views.
Using the UICollectionViewFlowLayout, the attributes for each item in the collection view can be be specified manually. So you could position them in a circle, or you could tilt them sideways as the collection view scrolls - achieving a carousel effect. When we were developing the Myntra iOS app, we needed a way to have a sticky header for the search results. This header would then show prominent Sort and Filter buttons.
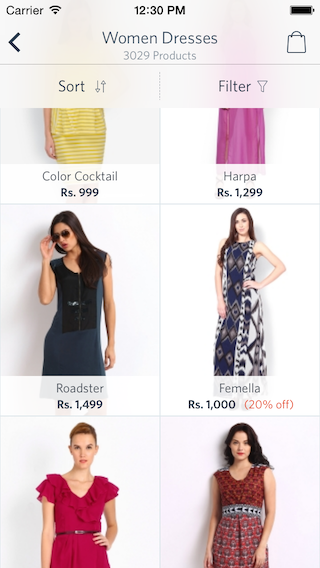
The sort/filter bar at the top is a section header in the collection of search results. So when you scroll down the results, the bar remains sticky at the top of the view. A quick search pointed us to CSStickyHeaderFlowLayout which is a simple flow layout subclass to achieve sticky headers.
But soon we needed sticky footers too. The idea was to make the Buy Now bar on the product page to stick to the bottom of the screen when you scrolled through the details of the product.
The output of this effort is MYNStickyFlowLayout, a drop-in collection view layout class, that gives you sticky headers and footers for collection views. Let’s dive into the code and understand what is going on.

Let’s walk through what it takes to implement a custom layout for UICollectionView. First you subclass UICollectionViewFlowLayout, because that is an excellent starting point. The most important method to implement is - (NSArray *)layoutAttributesForElementsInRect:(CGRect)rect. This is called by UICollectionView everytime it needs to display cells on the screen. It does this even before the cells are created. This is because the output of this method determines which cells are on screen and hence need to be displayed.
The view calls this method and expects an array of UICollectionViewLayoutAttribute objects in return. These objects have properties like frame, transform, alpha etc. that you can configure. In most cases, you probably want to start with the attributes generated by the parent class - UICollectionViewFlowLayout. Do this by calling [super layoutAttributesForElementsInRect:rect] and storing it in a mutable array because we are going to be making changes.
In our case, we iterate over all these attributes and pick out the headers, the footers, and the first and the last cells in each of the sections. Then we iterate over the first cells in each section. This is because when you scroll down, the first cell of the section will take the footer sticking to the bottom along with it as it scrolls out the bottom of the screen. Similar logic for the headers and the last cells in each of the sections.
Now, because the collection view assumes that the header/footer is not on the screen, the layout attributes that we got from the parent class might not contain the layout attributes for the header/footer and hence the view will not create them, and hence they won’t show on screen. So if we don’t find them, then we quickly add them to the array.
Also while we are at it, we position them based on the position of the first/last cells. The final effect is that as the section scrolls out of view, it takes it’s header or footer along with it.
Everytime the collection view scrolls, it recalculates these attributes. And finds the best position for the section headers and footers. Thanks to all of this math, we finally get a sticky footer for the product details screen.

What you see are two sections, and the first section has the Buy Now bar as a section footer. Hence it remains on screen while you are viewing the first section.
So that wraps up this post! Head over to MYNStickyFlowLayout on Github and try it out with the included example Xcode project. It is avaliable as a CocoaPod with the same name - MYNSticklyFlowLayout. Read the documentation on the repository to learn how you can use it in your project. Good luck!